


Supine-to-Sit Test: How to Check Pelvic Alignment and Correct It at Home
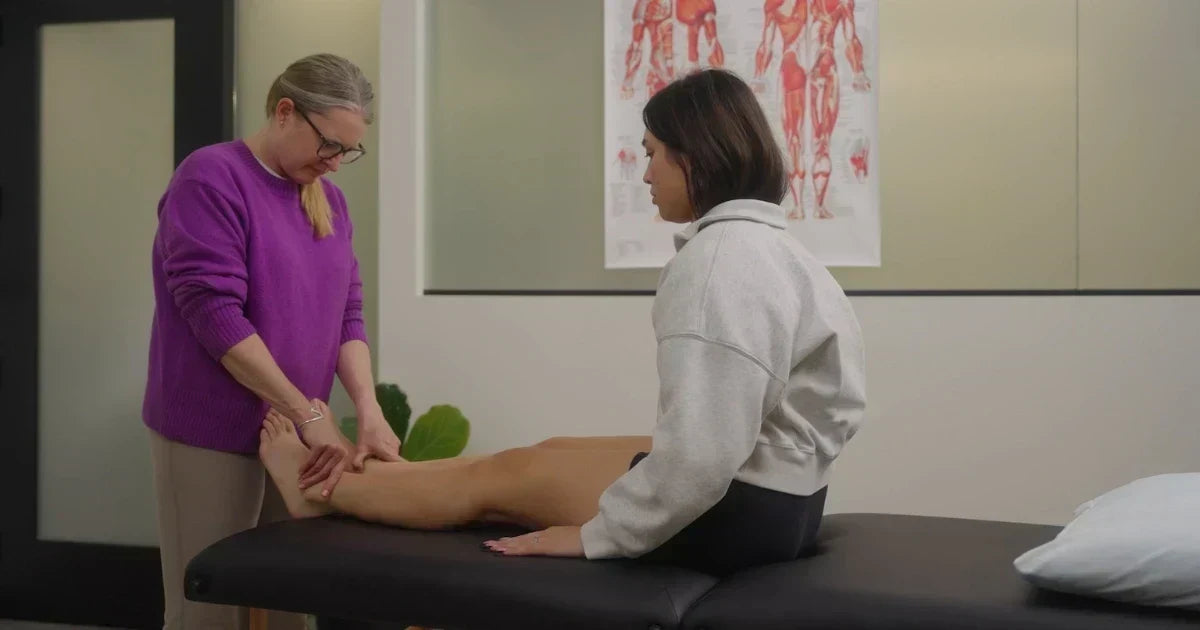
The supine-to-sit test is a simple at-home assessment that reveals whether your pelvis is out of alignment and being affected by tight muscles. You lie on your back, note the position of your legs, then slowly sit up, and observe whether one leg appears to shorten relative to the other. A leg that shortens as you sit up indicates an anteriorly rotated pelvis on that side: a sign of iliacus muscle tension. Correcting it involves releasing that tension with prolonged pressure, followed by a targeted pelvic realignment exercise, and then strengthening to support the improved position.
What Is the Supine-to-Sit Test?
The supine-to-sit test is a movement-based assessment used to evaluate pelvic alignment and detect muscle imbalances that may be pulling the pelvis out of its neutral position. It requires no special equipment and can be performed at home with the help of a partner.
Unlike imaging-based assessments, the supine-to-sit test captures how your pelvis moves in real time. This makes it especially useful for identifying functional leg length differences, or apparent differences in leg length caused not by bone length, but by how muscle tension is shifting the position of the pelvis.
How to Perform the Supine-to-Sit Test
To perform this test, it is best to have a partner observe leg position during the movement.
- Get into the starting position. Lie flat on your back on a firm surface with your legs straight and your arms relaxed at your sides. Your partner should stand at your feet, facing you.
- Before evaluating leg position, bend your knees and place your feet flat on the surface, lift your hips into a bridge position, lower back down, straighten your legs, and relax. This ensures the pelvis is set evenly on the surface before the assessment begins.
- Establish the baseline leg position. Your partner gently grasps both ankles and pulls your legs downward so they are aligned straight down from the pelvis. They note the position of your medial malleoli (the bony bumps on the inside of each ankle) relative to each other. You might observe that one leg is longer, equal, or shorter than the other.
- Slowly sit up. Without bending your knees, slowly rise to a long sitting position. You may use your arms to help. Keep your legs relaxed and passive throughout the movement. Your partner continues to hold your ankles gently and observes any changes in relative leg length as you rise.
- Observe the result. Your partner looks at the inside ankle bones again and notes what has changed. There are two possible outcomes: if there is no change in leg position and both legs remain even throughout the movement, the test does not indicate an anterior rotation in this assessment. If one leg appears to shorten relative to the other, this is the most clinically significant finding, and the leg that shortens as you sit up is on the side of an anteriorly rotated pelvis.
Note that any indication of the leg getting shorter counts as a positive result: longer to less long, longer to equal, equal to shorter, or shorter to even shorter.
Also note that if there is a difference in leg length in supine, and that difference remains the same as you sit up, that can be indicative of a different pelvic alignment issue.
WATCH: Assessing Pelvic Asymmetries with the Supine-to-Sit Test
What Does It Mean If One Leg Appears Shorter During the Supine-to-Sit Test?
The test results reveal how muscle tension is influencing the position of your pelvis. Here is what each outcome indicates.
When one leg appears shorter after you sit up, it reflects that the pelvis on that side has rotated forward (anteriorly) relative to the other side. The iliacus muscle, which runs along the inside surface of the pelvic bone and travels down to the inner thigh, is the primary driver of this rotation. When the iliacus is chronically tight, it pulls the front of the pelvic bone downward and forward, rotating that side of the pelvis out of neutral alignment.
Because the femur (thigh bone) attaches to the pelvis, an anteriorly rotated pelvis on one side effectively shifts that leg forward, making it appear shorter during the sit-up movement. This is a functional leg length difference, not a structural one. The bone itself has not changed, but the position of the pelvis has.

This matters beyond the test itself. An anteriorly rotated pelvis creates a cascade of effects throughout the body. The iliacus pulling on that side strains the sacroiliac (SI) joint, alters hip socket alignment, changes how the femur rotates, and can affect mechanics all the way down to the knee and foot. It also creates compensatory tension in surrounding muscles, including the piriformis, which can contribute to sciatic nerve irritation.
Why Does a Tight Iliacus Lead to Anterior Pelvic Rotation?
The iliacus is a fan-shaped muscle that lines the inside surface of the pelvis. Its job is to flex the hip and stabilize the pelvis relative to the thigh bone. When iliacus tension develops, the muscle remains in a state of partial contraction even at rest, generating a constant pull on the front of the pelvic bone.
Over time, this pull tilts the pelvis forward on the affected side(s). Because the iliacus can develop independent tension on each side of the body, it is common for one side to be significantly tighter than the other, creating the pelvic asymmetry and functional leg length difference that the supine-to-sit test is designed to detect.
Both iliacus muscles can be tight at the same time, contributing to anterior pelvic tilt on both sides. When both sides are tight symmetrically, the pelvis tilts forward evenly, without the side-to-side asymmetry that the supine-to-sit test is designed to catch. This won't show up as a positive result on the test, but it is still a pelvic alignment issue, and can create its own set of problems elsewhere in the body.
Iliacus tension commonly develops from prolonged sitting, repetitive hip flexion movements in athletics, prior injury, or postural habits that keep the hip in a shortened position for extended periods. Over 90 percent of adults carry some degree of iliacus tension, making it one of the most prevalent and most overlooked contributors to pain and movement dysfunction.1
READ MORE: What is the Iliacus Muscle?
How to Correct an Anterior Pelvic Rotation
If your supine-to-sit test reveals a shortening leg on one side, you have identified an anteriorly rotated pelvis on that side, which points to greater iliacus tension there. The following sequence addresses this in three steps: first, release the tension driving the misalignment, then help the pelvis return to a more neutral position, and finally build strength and stability to support that improved alignment over time.
This is Aletha's Release, Realign, Reactivate sequence.
Step 1 (Release): How to Release Iliacus Tension
Releasing iliacus tension requires prolonged, sustained pressure directly on the muscle. Stretching does not resolve muscle tension. Foam rolling, massage guns, and percussion tools do not reach the iliacus effectively, and also do not deliver the prolonged, sustained pressure the muscle needs to release. Research supports ischemic compression, the application of sustained pressure to a hypertonic muscle, as the most effective method for releasing this type of tension.2,3
The Hip Hook is specifically designed for this purpose. Its angled tip is shaped to reach inside the front of the pelvis where the iliacus lives, a location that is inaccessible to most other tools and difficult even for a trained practitioner to sustain pressure on for the required duration.

How to use the Hip Hook on the anteriorly rotated side:
- Identify which side showed the shortening leg; this is the anteriorly rotated side.
- Use the Hip Hook on the corresponding side by placing the tip inside the front of your pelvic bone, in the release zone just above the hip crease.
- Allow the tip to sink into the muscle with gentle body weight. Do not force the pressure.
- Once positioned, breathe slowly and deeply, allowing the muscle to soften under the sustained pressure.
- Hold each spot for 90 seconds or more to allow the muscle to fully release.
- Explore 1 to 3 spots along the iliacus on the affected side.
If you are new to iliacus release, you can begin with the standing variation against a wall to ease into the pressure. The goal is moderate discomfort that diminishes within the first 30 seconds as the muscle begins to soften.
A skilled manual therapist familiar with ischemic compression technique can also perform this release. Either approach works, but the key principle is the same: sustained, targeted pressure is necessary. Stretching and mobility exercises alone will not release this type of tension.
LEARN MORE: How to Use the Hip Hook
Step 2 (Realign): How to Use the Pelvic Realignment Exercise
After releasing iliacus tension, the pelvis has the opportunity to return to a more neutral position. This exercise uses a muscle energy technique to gently encourage the pelvis back into balance.
This exercise is performed only on the anteriorly rotated side, which is the side that showed the shortening leg in your supine-to-sit test. Performing it on both sides is not harmful, but it will be less effective.
How to perform the pelvic realignment exercise:
- Lie on your back on a firm surface with your knees bent and feet flat on the floor.
- Lift both feet off the ground so both knees are in the air.
- Place both hands behind the knee on the side that is anteriorly rotated.
- Push your knee downward against your hands as if trying to press that foot toward the ground, but resist fully with your hands so no actual movement occurs.
- You will feel your glute and hamstring muscles engage on that leg. These muscles, when activated, help encourage the pelvis back toward a more neutral, posterior position.
- Hold the contraction for 2 seconds, then relax while keeping both feet off the ground.
- Repeat 10 times.
The glutes and hamstrings being activated here are antagonists to the hip flexors. When the iliacus has been pulling the pelvis into anterior rotation, the glutes and hamstrings on that side become relatively underactivated. This isometric contraction gives them an opportunity to pull the pelvis back toward neutral, complementing the release that was just performed.
This exercise is most effective immediately after the iliacus release, while the tension has been softened and the pelvis is most receptive to positional correction. In a pinch, such as when you're on the go and doing a release isn't accessible, this exercise can be used on its own for temporary relief. But it will be most effective when it follows a release.
Step 3 (Reactivate): Why Strengthening Works Better After Release and Realignment
Once the iliacus has been released and the pelvis has been guided back toward neutral alignment, the body is ready to benefit from mobility exercises, stretches, and strengthening work. This is the third phase of the Release, Realign, Reactivate sequence, but this is often where most people start (they skip the release and realignment work).
Working on mobility and strength when the pelvis is still out of alignment, and the iliacus is still under tension, is significantly less effective. Strengthening around a twisted and tense core is harder, produces less coordinated results, and requires more ongoing effort to maintain. The muscles on the tighter side are inhibited and cannot contract to their full capacity. The opposing muscles are overworked trying to compensate.
When you begin reactivation from a more neutral, released starting point, several things change for the better:
- The glutes and hamstrings that were previously underactivated can now be recruited more effectively.
- Hip mobility exercises can move through a fuller, more symmetrical range.
- Strengthening work builds stability around a better position, so results last longer.
- Pain and tightness are slower to return because the root cause has been addressed rather than worked around.
Exercises like glute bridges, clamshells, hip hinges, and band walks are all excellent choices for building the stability that reinforces improved pelvic alignment. Stretches for the surrounding muscles, including the piriformis and hip rotators, are also more effective at this stage because the primary driver of tension in those muscles, the iliacus, has already been addressed.
How to Use the Supine-to-Sit Test to Track Your Progress
The supine-to-sit test is not only useful as a one-time assessment. It can also serve as an ongoing progress check. After completing an iliacus release and the pelvic realignment exercise, re-run the test to see whether the leg length discrepancy has improved.
Over time, as iliacus tension decreases and your pelvis learns to hold a more neutral position, the test result should show less asymmetry during the sit-up movement. For most people, the change does not happen in a single session. Consistency with the 3-step sequence (Release, Realign, Reactivate) is what creates durable improvement.
When to See a Professional
The supine-to-sit test and the Release, Realign, Reactivate protocol are designed for general wellness and self-care, and work best for people dealing with chronic tension patterns and movement-related discomfort.
If you are experiencing acute pain, pain following an injury, sharp neurological symptoms such as numbness or tingling into the legs, or pain that worsens with movement, seek evaluation from a qualified physical therapist, osteopath, or physician before proceeding.
A practitioner familiar with manual therapy and pelvic alignment can confirm the findings of the supine-to-sit test and address any structural or neurological factors that may need to be ruled out first.
Frequently Asked Questions
Is the leg length difference detected by the supine-to-sit test real?
The difference observed in the supine-to-sit test is real in terms of your pelvic position, but it is typically functional rather than structural. The bone itself has not changed. What changes is the position of your pelvis. When the iliacus pulls one side of the pelvis into anterior rotation, it shifts the attachment point of the leg bone forward, making that leg appear to shorten as you sit up. This type of functional leg length difference can often be addressed significantly through iliacus release, pelvic realignment, and other strengthening and stability exercises.
Do I need a heel lift for my leg length difference?
If your leg length difference is functional, a heel lift isn't the right solution and can make things worse, since it works around the muscle tension and pelvic rotation instead of addressing it. In the rare case where there is an actual structural leg length difference, a heel lift can be a helpful tool for supporting alignment. Working with a practitioner to identify whether a leg length difference is functional or structural is a good idea before deciding on a correction.
Can I do the supine-to-sit test without a partner?
The test is most accurate with a partner observing your leg position throughout the movement. Because the changes in leg length can be subtle, having someone watch from a consistent vantage point at your feet provides a more reliable assessment than trying to observe yourself. If a partner is not available, recording the test from a fixed camera position and reviewing the footage is a useful alternative.
How long does it take for pelvic realignment to work?
Many people notice some improvement in how their pelvis feels after a single release and realignment session. However, how quickly the pelvis holds an improved position long-term depends on how long the tension pattern has been present, how consistently the protocol is followed, and how much the reactivation phase is supporting the new position. For some people, meaningful improvement takes several weeks of consistent practice.
Do I need to release both sides even if only one showed anterior rotation?
The iliacus release can be performed on both sides, as both sides commonly carry some degree of tension. Start on the side identified by the test and spend more time there (exploring more spots and allowing longer holds) before moving to the other side. This helps address the primary source of imbalance first while still supporting overall tension relief.
Can the supine-to-sit test identify other pelvic issues besides anterior rotation?
The supine-to-sit test is specifically designed to identify anterior pelvic rotation associated with iliacus tension. A leg that shortens upon sitting up is a positive result indicating anterior rotation on that side. The opposite side of the pelvis could be posteriorly tilted, but this is not always the case. For a more complete pelvic assessment, or for complex cases involving multiple alignment issues, working with a physical therapist or manual therapist who specializes in pelvic and spinal alignment is recommended.
Why doesn't stretching correct pelvic alignment if the iliacus is the cause?
Stretching works on a muscle's length and flexibility, but it does not resolve muscle tension in the way that sustained pressure does. Iliacus tension involves the muscle remaining in a partially contracted state even at rest, which is different from a muscle that won't fully elongate. Prolonged pressure (ischemic compression) is what interrupts this resting contraction and allows the muscle fibers to soften. Stretching after the release, once the tension has been addressed, can then be a useful part of maintaining flexibility.
What if my supine-to-sit test shows no change? Does that mean my pelvis is aligned?
A symmetrical result is a positive sign for pelvic alignment in this plane of motion. However, pelvic alignment involves multiple planes and multiple structures, so this test gives one useful piece of information rather than a complete picture. If you are experiencing pain or movement limitations, additional assessment with a healthcare provider is always a good next step.
Why does one leg look shorter when I sit up?
When one side of the pelvis is anteriorly rotated, that rotation is present all the time, whether you're lying down, sitting, or standing. Sitting up doesn't create the rotation. What changes is how that rotation affects the position of your leg. Because of the way the head of the femur fits into the hip socket, an anterior pelvic rotation shifts the head of the femur further away from you when you're lying down, and pulls it closer to you when you sit up. This is what makes the leg look shorter as you sit up: it's revealing the rotation that was already there, not creating a new one.
Is the supine-to-sit test the same as a leg length test?
The supine-to-sit test is sometimes confused with structural leg length tests, but they measure different things. A structural leg length test assesses whether there is an actual difference in bone length between the two legs. The supine-to-sit test assesses pelvic position, specifically whether iliacus tension is rotating one side of the pelvis forward, which creates an apparent difference in leg length during movement. A leg that appears shorter in the supine-to-sit test is not shorter in terms of bone length; it is responding to how the pelvis is positioned.
References
- Liu, Ying and Palmer, Joy L. "Iliacus Tender Points in Young Adults: A Pilot Study." Journal of Osteopathic Medicine, vol. 112, no. 5, 2012, pp. 285–289. https://doi.org/10.7556/jaoa.2012.112.5.285
- Cagnie B, et al. Effect of ischemic compression on trigger points in the neck and shoulder muscles in office workers: a cohort study. J Manipulative Physiol Ther. 2013;36(8):482–489. https://doi.org/10.1016/j.jmpt.2013.07.001
- Simons DG, Travell JG, Simons LS. Myofascial Pain and Dysfunction: The Trigger Point Manual, Vol 1, 2nd ed. Baltimore: Williams & Wilkins; 1999.


If you’ve tried PT, massage, stretching, and the pain keeps coming back, the problem is likely not where you’re feeli...
- HSA/FSA eligible
- 60-day returns
- Free shipping
If you’ve tried PT, massage, stretching, and the pain keeps coming back, the problem is likely no...